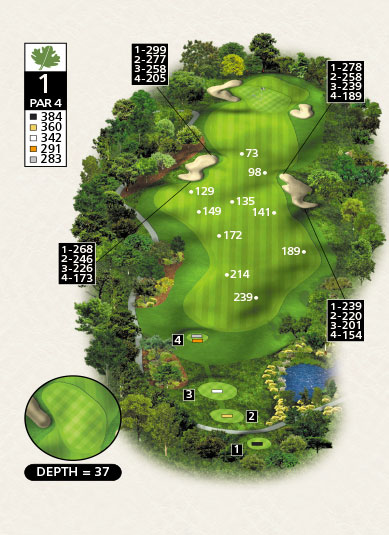
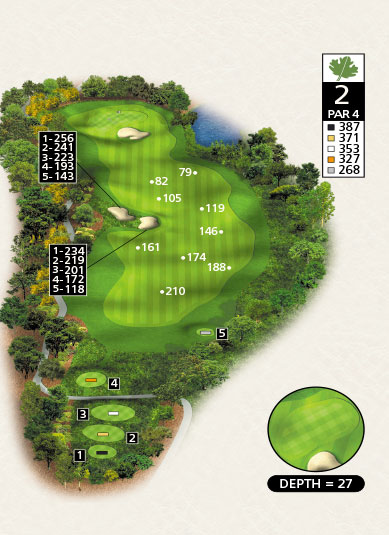
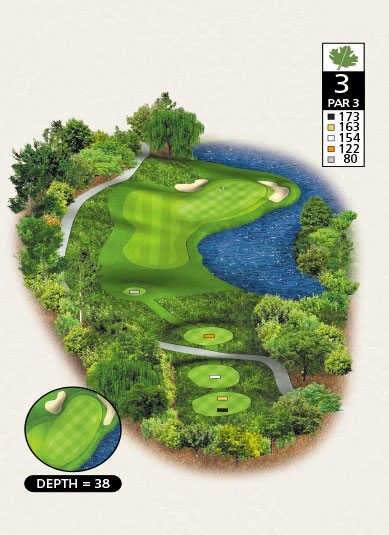
Oak Creek Golf Club offers numerous opportunities for you to challenge your game amid a lush setting complete with 18 picturesque holes. For a quick preview of what each hole has in store for you, click on the corresponding number below. Then come experience this 71-par, 6,834-yard Irvine golf course that beautifully captures and elevates all there is to love about the game of golf!
Take the full course tour
View Individual Holes
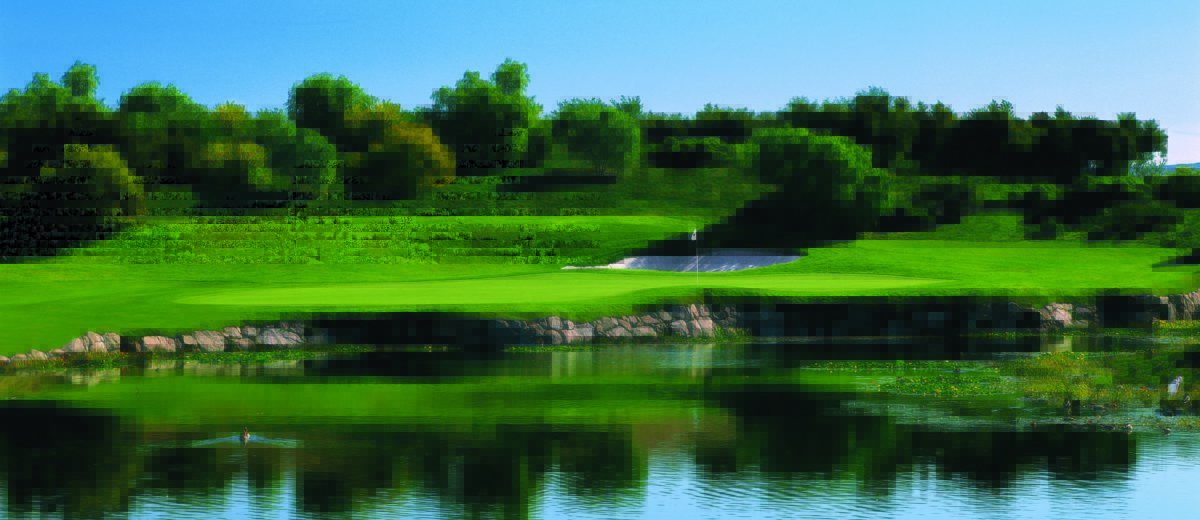
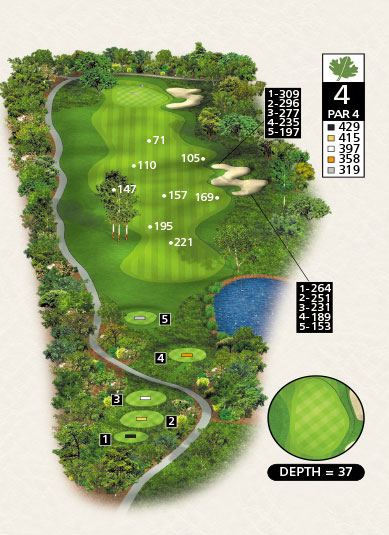
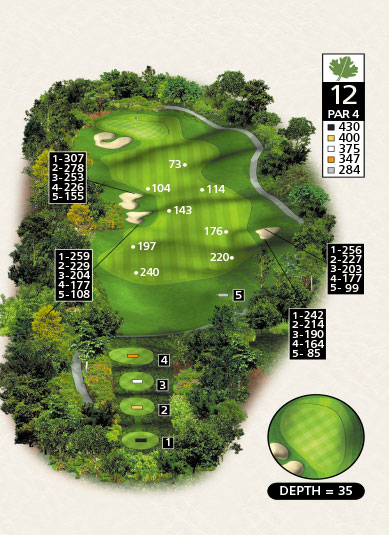
Camino Real
Par 4 Handicap 12
A tee shot down the left-hand side of this fairway with a driver is the play of choice for most. A large fairway bunker makes the right side less appealing, however second shots onto the green from this medium-length par four are better from the right. Guarded on the left and the right by deep bunkering, the green slopes from back to front.
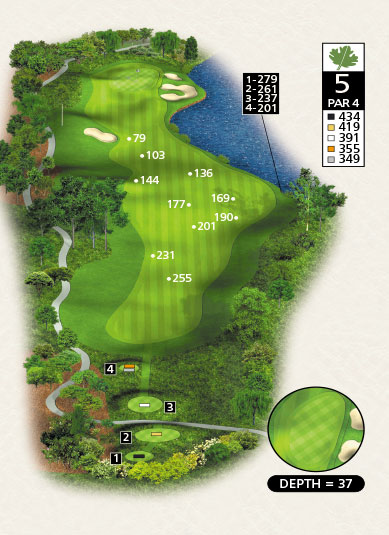
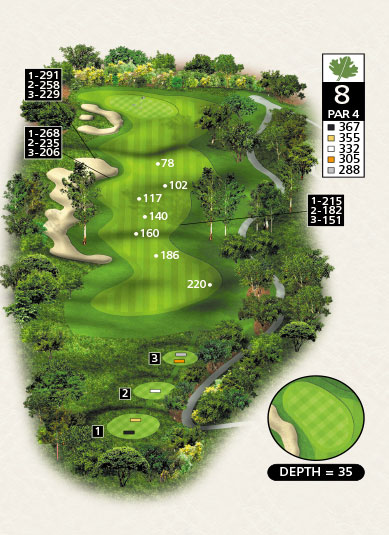
Runaway
Par 4 Handicap 16
The fairway bunkers that dominate the view from the tee box taunt players to try and fly their tee shots over them. Players who are able to do this are rewarded with a short pitch shot, however few succeed and most prefer hitting a driver or fairway wood into the safety of the fairway landing area. Mid to lofty iron second shots are normal, into a two-tiered green that is protected in front by a deep bunker.
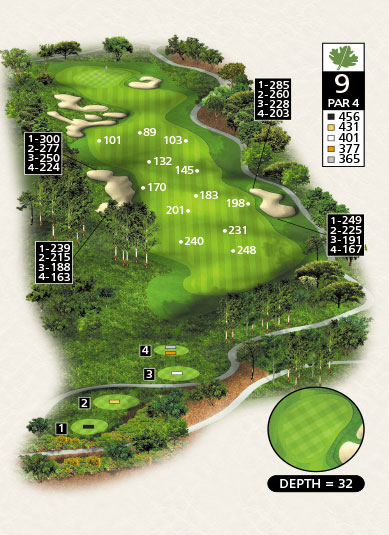
Brady’s Pond
Par 3 Handicap 14
Another signature hole, this par three is the shortest hole on the golf course, but not short on challenge. Mid to lofted iron shots are required here, from an elevated tee box that’s often downwind. Guarded on three sides by Brady’s Pond, this beautiful little hole is a favorite of most players.
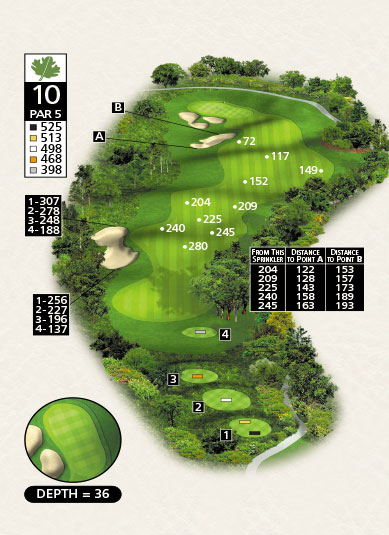
The Grove
Par 4 Handicap 10
With the wind coming directly over the players’ backs, this long par four plays shorter than one would expect. After landing in an undulating fairway, players will hit mid to long irons into a severely tiered green, protected on the right side by two cavernous bunkers. With a front pin placement, players can use the steep slope in the middle of the green as a backstop to spin the ball back.
Alice Springs
Par 4 Handicap 2
Extremely long is one way to describe the challenges of this hole. Long, low tee shots are rewarded with mid iron shots into a lakeside green. Less optimal shots leave players with a difficult choice of playing a long iron or fairway wood into a narrowing target green, or laying up and chipping it in close. Finishing this hole with a par four is an accomplishment.
Lowell’s Creek
Par 5 Handicap 4
This long par five is a true test of ball striking. Lowell’s Creek twists its way down the entire right side of the fairway. Players are forced to hit three long shots to reach this undulating green in regulation. Bunkers down the right and left side of the fairway demand strategy and accuracy. It’s not all toil however. Watch closely to see heron and egret feed on crayfish in the creek.
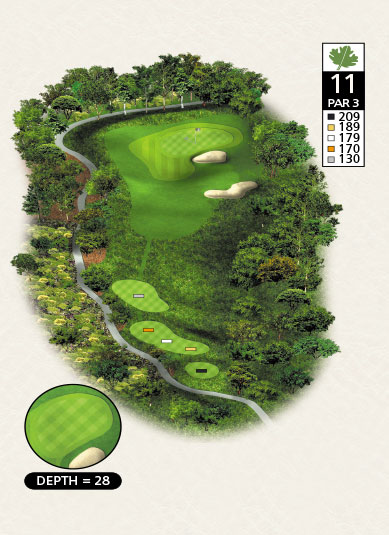
Long
Par 3 Handicap 8
Whether the pin is in front, or tucked into the back right corner, this three par is a challenge for any player. Long iron or fairway wood shots are called for from the tee. Shots played from left to right are best. Wind direction is usually from left to right as well. Bunkers on either side of the green are intimidating, but leave players with par-saving opportunities if hit.
Hourglass
Par 4 Handicap 18
The picturesque fairway of this short par four can be unnerving. Players should choose a long iron or fairway wood from the tee box to avoid landing in the bunker that skirts the left side of the fairway. A good tee shot between the eucalyptus trees will leave players with mid to lofted iron shots into the green. Par is good. Birdie is better. On this hole, the chance to make either is excellent.
Bunker Hill
Par 4 Handicap 6
This snaking par four is long and demanding. A right to left tee shot with a driver will leave players sitting atop the hill with a perfect setup for the approach. Eucalyptus trees, bunkers and high fescue rough guard both sides of the fairway. With the bell tower looming in the background, the green is protected by a deep bunker on the right and a series of bunkers on the left. The two-tiered green slopes from front to back and requires players to accurately place their shots depending on the pin placement.
Breakout
Par 5 Handicap 11
A big hit from left to right is the perfect play on this par five. Although the fairway is generous, a drive too far to the right into the big eucalyptus trees will leave players with a slim chance at par. Too far to the left and the second shot will be played from the sand. The green is reachable in two, but demands a long carry over the three deep bunkers. Upon choosing to lay up short and right, players are left with a short pitch into a sloping green.
Great Depression
Par 3 Handicap 5
A left to right long iron into this stadium green is the play of choice. From the elevated tee box, players can expect the hole to play one club shorter. One should be mindful to stay clear of the green-side bunker. The wind blows predominantly from left to right.
Grand Banks
Par 4 Handicap 3
This long, four par rewards accuracy from the tee. The landing area is guarded ominously by two large bunkers. Reachable with a mid iron, the green accepts errant shots to the right and punishes shots pulled to the left. Shots put in the huge green-side bunker in the left front of the green makes for an extremely challenging up and down.
Right of Way
Par 4 Handicap 15
One of the widest fairways on the golf course, players are spoon-fed confidence while standing on the tee box. Not a long hole, but demanding of an accurate second shot. A good lofted iron shot will leave players with a makeable birdie putt. The false front of this sloping green is a player’s nightmare when the pin is placed towards the front of the green.
Chicanery
Par 4 Handicap 17
This short par four, dogleg left is a player’s chance to get a stroke back on par. Whether the tee shot is played with a long iron or a driver, players are left with a lofted iron shot into a large, back-to-front sloping green. Tall eucalyptus trees surround the back of the green like a majestic gallery waiting to applaud a close approach shot.
Outback
Par 4 Handicap 1
Protected on the left from the leafy arms of the bordering eucalyptus trees, and on the right from an imposing bunker, this fairway is important to hit if a player hopes to leave this hole with a par four or better. The drive is only half the battle. After a long, accurate tee shot, players are left with a mid-to-long iron approach in to an elevated green. Shots missed to the right may end up several yards down at the bottom of the hill.
Crescent Moon
Par 4 Handicap 13
Framed down the entire left side by a daunting waste bunker, this fairway dog legs right to left to a well protected, two-tier green. Tee shots directed at the bunker located at the elbow of the turn will leave players with a lofted iron second shot into the wind. Shots hit long or short on this green make for a challenging two putt.
Saddle
Par 3 Handicap 7
This long par three is protected in the front by a bear of a bunker. Up and downs from here are extremely rare, so it is advisable to play tee shots to the right side of the green. Players with more bravado will be rewarded by hitting high right to left shots with a long iron or fairway wood. Par on this hole is a good score.
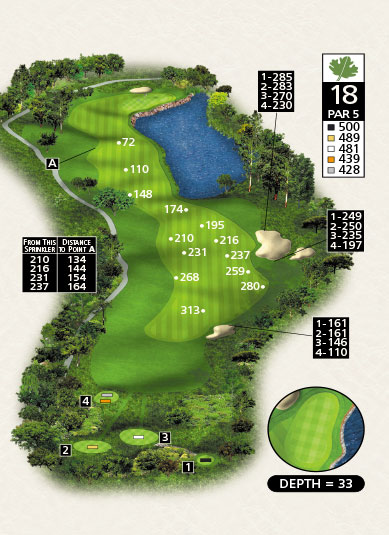
Fortitude
Par 5 Handicap 9
This signature hole snakes down from the tee box to a picturesque green complex that sits on the edge of a pristine lake. Reachable in two for longer hitters, most players will opt to lay up with a mid iron. The green accepts shots in from the left of the fairway much better than from the right. It’s guarded in front by an ominous rock wall and in back by a hillside bunker.